Categories

The Honeywell T4 Pro Thermostat is a programmable, efficient device designed for easy installation and operation. It features an on-screen menu for guided setup and a universal mounting system, making it suitable for various heating and cooling systems. Part of Honeywell’s ProSeries, it offers advanced temperature control for optimal comfort.
The Honeywell T4 Pro Thermostat is a programmable device designed for efficient temperature control in residential settings. It features an intuitive interface, on-screen installation guidance, and a universal mounting system for easy setup. The thermostat supports various heating and cooling systems, offering advanced scheduling and energy-saving capabilities. Its compact design and user-friendly controls make it a versatile solution for modern home comfort needs.
The Honeywell T4 Pro Thermostat offers a range of innovative features, including adaptive recovery, smart scheduling, and energy-efficient settings. It provides on-screen installation prompts and a universal wall plate for seamless setup. With compatibility with various HVAC systems, it ensures optimal performance and user convenience. Additional features include optional cover plates for a polished look and advanced temperature control options, making it a comprehensive solution for home climate management.

Ensure system compatibility, gather tools, and verify power requirements. Turn off power at the breaker before starting installation to ensure safety and proper setup.
The Honeywell T4 Pro Thermostat is compatible with 1H/1C systems, including forced air and hydronics. It requires a Class 2 transformer with a maximum power of 5.5W. Ensure your system meets these specifications before installation. Verify voltage and power requirements to avoid compatibility issues. A 24V transformer is necessary for proper operation. Check system compatibility to ensure smooth installation and functionality.
To install the Honeywell T4 Pro Thermostat, you will need a screwdriver, drill, level, and wall anchors. Ensure you have the UWP Mounting System, Honeywell Standard Installation Adapter, and decorative cover plate from the package. Additional tools like a hammer and measuring tape may be necessary. Verify all components are included before starting. Some tools, such as a drill and level, are not provided and must be supplied by the installer.

The Honeywell T4 Pro Thermostat installation involves turning off power, ensuring the UWP is level, and following on-screen prompts for a seamless setup experience.
The optional cover plate is ideal for concealing paint gaps or uneven wall surfaces. To install it, align the cover plate with the UWP Mounting System, ensuring it fits securely. Gently snap it into place without over-tightening the screws. This step enhances the thermostat’s appearance while maintaining functionality. The cover plate is compatible with various Honeywell T4 Pro models and does not interfere with the device’s performance or wiring.
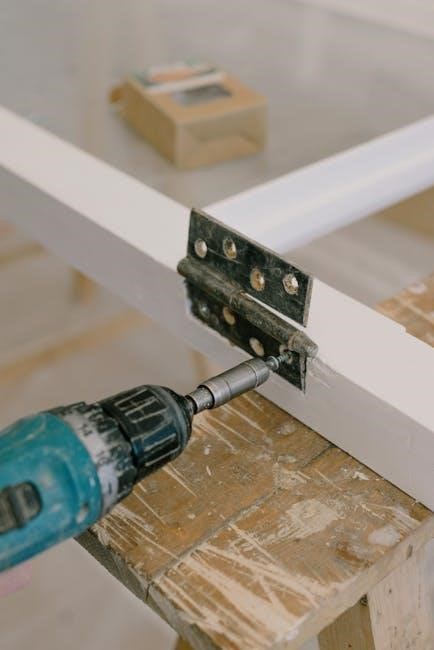
First, turn off the power to your heating and cooling system. Open the package to find the UWP Mounting System. Position the UWP on the wall, ensuring it is level, and mark the hole locations. Drill holes at the marked spots and lightly tap the provided wall anchors into place. Mount the UWP using the screws, avoiding overtightening. Finally, attach the thermostat to the UWP, ensuring it is securely fastened and properly aligned for optimal performance.
The Honeywell T4 Pro allows users to set heating and cooling schedules, with features like adaptive recovery. It offers smart home integration for remote control and customization.
Setting up the Honeywell T4 Pro Thermostat’s schedule involves accessing the on-screen menu using the plus, minus, and select buttons. Choose the scheduling option and select the days you wish to program. Set specific temperatures for different times, such as morning, away, return, and sleep periods. Utilize the adaptive recovery feature to ensure the system learns and adjusts to reach desired temperatures timely. For weekends, copy weekday settings or configure separately. Enter the default passcode (1234) to access advanced settings and change it for security. Save your schedule to ensure it runs correctly, and verify the time and date are accurate for proper operation.
The Honeywell T4 Pro Thermostat features Adaptive Recovery, which learns how long it takes for your system to reach the desired temperature. It activates heating or cooling early to ensure comfort by your scheduled time. Over time, the thermostat adapts to your system’s performance, improving efficiency. Smart features include on-screen guidance, programmable schedules, and energy-saving modes, helping you optimize your home’s temperature control for both comfort and energy efficiency.

The Honeywell T4 Pro Thermostat offers smart home integration, enabling seamless connectivity with various systems. It supports energy-efficient settings and customizable options, ensuring optimal temperature control and comfort.
The Honeywell T4 Pro Thermostat seamlessly integrates with smart home systems, offering voice control through Amazon Alexa and Google Assistant. Its compatibility with various smart hubs ensures easy temperature adjustments. Additionally, the thermostat supports Wi-Fi connectivity, allowing remote access via Honeywell’s app. This feature-rich integration enhances convenience and energy management, providing users with a modern and efficient way to control their home’s climate. Installation guides emphasize proper setup for optimal connectivity performance.
The Honeywell T4 Pro Thermostat offers advanced energy-saving features, including adaptive recovery, which learns your system’s behavior to pre-empt temperature changes. Customizable settings allow users to create tailored heating and cooling schedules, optimizing energy use; The thermostat also features smart alerts for filter changes and system maintenance, ensuring efficiency and longevity. These settings can be easily adjusted via the intuitive interface, making it simple to balance comfort and energy savings effectively.
Common issues include wiring problems, display malfunctions, and sensor errors. Refer to the manual for step-by-step solutions to resolve these issues efficiently and restore functionality.
Wiring and power issues are common during installation. Ensure the power is off at the breaker before starting. Check for loose connections and verify wire labels match the terminal designations. If the display is blank, confirm batteries are installed correctly or check the wiring for any short circuits. Refer to the wiring diagram in the manual for proper connections. If issues persist, consult the troubleshooting section or contact Honeywell support for assistance.
If the display is unresponsive, check battery installation or power supply. For incorrect temperature readings, ensure the sensor is clean and free from obstructions. Calibrate the sensor via the menu if necessary; A blank or flickering display may indicate faulty wiring or power issues. Reset the thermostat to factory settings if problems persist. Contact Honeywell support for further assistance if malfunctions continue after troubleshooting steps.

Regularly clean the display and sensors to ensure accuracy. Replace batteries annually or as needed. Check and tighten all connections to maintain proper functionality and performance.
For optimal performance, clean the Honeywell T4 Pro’s display and sensors regularly. Dust can accumulate and affect temperature accuracy. Replace batteries annually or when the low-battery indicator appears. Check wiring connections to ensure they are secure and free from corrosion. Update firmware periodically to access new features and improvements. Avoid exposing the thermostat to direct sunlight or moisture to prevent malfunctions and ensure reliable operation.
Regular firmware updates ensure the Honeywell T4 Pro operates with the latest features and security. Check for updates through the thermostat’s menu or the Honeywell Home app. Download and install the newest version to enhance performance and fix potential bugs. Always follow the manufacturer’s instructions during the update process. Never power off the thermostat during an update to avoid system corruption. Visit Honeywell’s official website for detailed update instructions and support.

Ensure the thermostat is level, wiring is secure, and system operation is tested. Verify battery levels and functionality before finalizing the installation process.
After installation, verify the Honeywell T4 Pro Thermostat’s functionality by checking the display, wiring connections, and system operation. Ensure it powers up correctly and responds to temperature adjustments. Test heating and cooling cycles to confirm proper operation. Check battery levels and ensure the UWP mounting system is secure and level. Review all settings to ensure they align with your home’s heating and cooling needs for optimal performance and comfort.
Once installed, test the Honeywell T4 Pro Thermostat by running heating and cooling cycles to ensure proper operation. Check if the thermostat learns your system’s behavior over time, adjusting start times for optimal comfort. Verify adaptive recovery and smart features function correctly. Ensure the display is responsive and all scheduled settings work as intended. Confirm the UWP mounting system is secure and stable for accurate temperature control and seamless integration with your home’s HVAC system.